Best Practices for Scanning Documents for Submission
Document imaging systems are designed with an emphasis on storage and efficiency. Formats are often less pixel dense to capture needed information in a clear and space efficient manner. With the advent of modern cameras and cameras on phones picture quality and pixel density are far beyond what document imaging systems were originally designed for. As consequence, document imaging systems often struggle when attempting to convert high quality images to document grade. The result are often blurry or unreadable conversions. Below, our office has outlined some general information to help prepare document scans for submission to the Secure File Upload page.
General Tips for Take Photos of Documents for Submission:
- Utilize natural light. Place documents on a table near a window if possible.
- Hold the phone square to the document, avoid angles.
Recommendations for Document Preparation by Phone Type:
Android Recommendations:
- Open the Google Drive
 Application
 - Tap the plus symbol
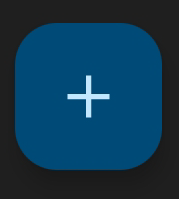 at the lower right corner of your screen.
 - Select Scan
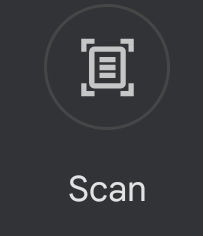 and your camera application will launch.
 - Capture a picture of your document(s).
- After the picture is taken you will be presented with the options to Change the Color of the image, Rotate the image, and to Crop the image.
- Color - for image conversion clarity it recommended you select the “Black & white” option.
- Rotation – this allows you to rotate the image in 90 degree increments.
- Cropping - this allows you to cut out unneeded items such as the background of the image outside the edges of the document.
- After completing your edits of the document, you will now save the document to your Google Drive by pressing the "Next" button
 .
. - Proceed to the Secure Document Upload and upload your document.
iOS - iPhone/Ipad Recommendations:
- Open the Notes
 application on your iPhone or iPad
 - Tap the pencil on paper icon
 in the bottom right corner to create a new note.
 - Click on the camera icon
 on the notes menu.
 - Select Scan Documents
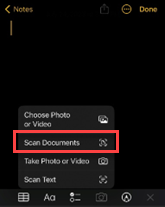 from the menu.
 - Place your document on a flat, solid colored surface and center it on your iPhone or iPad screen using your front facing camera
- Once the document is aligned, it will be scanned automatically
- Save the document to your files
- Proceed to Secure Document Upload and upload your document from your iPhone or iPad files folder
Office of Student Financial Aid Services Secure File Upload Instructions
Communications via email are not secure and we ask you to refrain from emailing documents containing sensitive information to our office. For the safety of your information, UConn has established a secure system to allow you to upload your sensitive documents to us.
If you prefer, you can choose to submit documents by other methods as outlined on the Guidelines for Submitting Documents page, but the secure upload system will deliver your documents to our office more quickly and allow for the processing of your financial aid more quickly.
Preparing Your Document
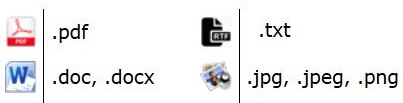
- Ensure that the file you want to upload is in an acceptable format (.pdf, .doc, .docx, .txt, .jpg, .jpeg, .png).

- Signatures for a student's spouse or parent must be handwritten. Typed/digital/electronic signatures for parents and/or spouses are not accepted.
- Any passwords or encryption should be removed.
- File names should not contain any special characters (for example: / , + & ! ' *).
- The maximum size of the file that can be uploaded is 8MB. Files larger than 8 MB will need to be broken into smaller files for upload.
Submitting Your Document
-
In order to provide their signature electronically, students MUST use the link below and login with their NetID.
https://fileupload.financialaid.uconn.edu/form_upload.php?students -
Users without a NetID should use https://fileupload.financialaid.uconn.edu/form_upload.php and provide handwritten signatures for students, spouses, and parents.
When you access one of the above links, you are brought to the associated secure file upload form (as shown on the image below). All fields on the form are required.
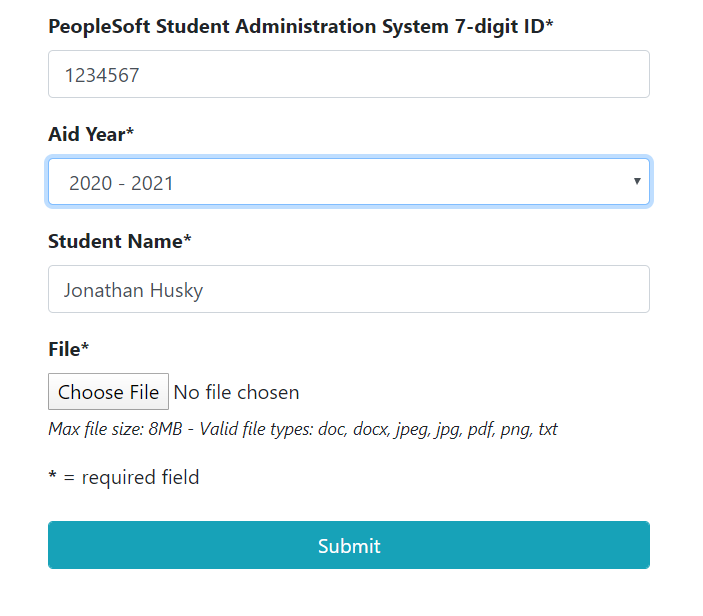
- PeopleSoft Student Administration System 7-digit ID: This field is required in order to identify the student to whom the document belongs. It is automatically filled in if you login with your NetID.
- File to Attach: Click on the Choose File button and browse to the document you would like to upload. Click on that file and then choose 'Open'. You will be returned to the above screen and your file name will appear beside the Choose File button.
(Please Note: You may only submit one document at time. If you have multiple documents to submit, you can start the process again, after you have finished with this document, by returning to this page.)
Click the blue Submit button. You should see a screen that says:
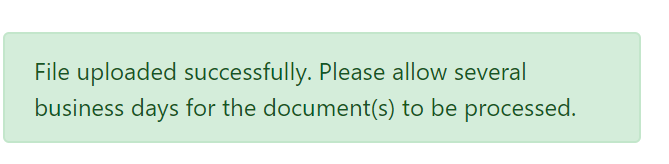
The above message confirms that document has been submitted.